
Recently I was asked to output a video for a large screen projection into 4 unequal parts. Why would anyone need this you may ask? Well these are used for large LED screens for rock / music concerts, auto car shows, trade show etc. Below is the 10 step easy route I used in After Effects to get this done.
The task given was to convert a HD video into 4096 x 1408 size and then cut it up into 4 parts, now if it was a equal division it would be a easier task but have a look at pic 1 below and it should explain why this is complicated process.
 |
| Pic 1: Screen Requirements |
Step 1: Prepare the video.
Luckily for me, that was a call the client had to take, and they went with crop the top and bottom option. Whatever is the size of the full final resolution, is the size you should prepare your master video and export it. If your master video is only for the giant screen it is ideal that you prepare your output in the full size right from the beginning rather than scale it up later.
 |
| Pic 2: HD image without crop |
 |
| Pic 3: HD image scaled up to fill up the width |
TIP - Prepare the video in the full size required, check if all your shots fit within the screen dimensions and all your supers and effects are within the screen's display. HD does not blow up to this proportion so the choice was
1. Keep the full HD image but have blank space on either side Pic 2 OR
2. Fill up the screen and crop top and bottom of the image. Pic 3.
Once you have adjusted your super's and effects and whatever you can do to keep inside the visual area, you export the video ideally in the uncompressed format in the size requested, in this case 4096 x 1408.
You will probably say that you could do the same thing by just applying the scale on the image and then using the video, but I have noticed that sometimes after cropping you may have a one or two pixel problem which will shift your image and that shows up even more on a giant screen. So its safer to use a video where you are only applying the crop and no other effects on it while doing this process.
Step 2: Import the video in After Effects.
Import your uncompressed video, or best resolution video into the project.
Step 3: Create 4 compositions.
Create 4 compositions, give the names V1 – V4 corresponding the 4 screens, size of each screen to be as requested. (See pic 1)
Use different bright background colours to help identify each one quicker, also if you have a bright solid colour it will help to identify if there is a gap during the crop process, even if it is for one pixel at the edges, this helps avoid any mistakes.
Keep the pixel ratio to square.
In this case the V1 and V2 will be 2048x1024. (You get that by 1408 - 384 on the height.) and V3 and V4 will be 2048 x 384 (see pic 1 & 4)
 |
| Pic 4: V1 to V4 composition settings |
Step 4: Place the video in each composition.
Drag your full resolution video in each of the compositions.
Step 5: Re-set the anchor points.
Re-set the anchor point in all compositions to 0,0 that should take the anchor to the top left corner of the image (See pic 5 & 6)
 |
| Pic 5: Reset position for V1 |
Step 6: Re-set the position in each composition.
Re-set your image positions so that the image occupies the different corner in each composition
V1 will be 0,0 that takes the entire image to the top left corner. (See Pic 5)
V2 will be -2048, 0 (which is minus half of the total width, since the width is divided into equal parts)
V3 will be 0,-1024 (which is minus top part of the height
V4 will be -2048, -1024 (which is minus half width and top part of the height) [See pic 6]
 |
| Pic 6: Reset position for V4 |
The reason to reset your anchor points and positions is so that the math of dividing the screens is easier and quicker to check, you could do this without resetting any of the points but that would mean that you would need to calculate the difference from the centre of the image to the various corners of the screen required, which trust me is a whole lot of math to get right.
Step 7: Export the 4 cropped videos.
Render out V1 – V4 in the same setting as imports (uncompressed), before you render out please check that the video has been positioned in exact corners of every composition, if the video is not in position you would see the background colour even if its off by 1 pixel. If its off you would need to go back and check your numbers all along the process right from your master export.
 |
| Pic 7: 4 parts of the cropped video |
Step 8: Checking the 4 cut videos.
To check if the video has been cut fine, make a master comp of the full size (4096 x 1408 in this case) Import all the cut video exports (V1 - V4) into the master comp, re-set all the anchor points to 0,0 and re-set all the positions for V1 - V4 but without the negativeIn this case it will be
V1 will be 0,0
V2 will be 2048,0
V3 will be 0,1024
V4 will be 2048,1024 (See pic 8)
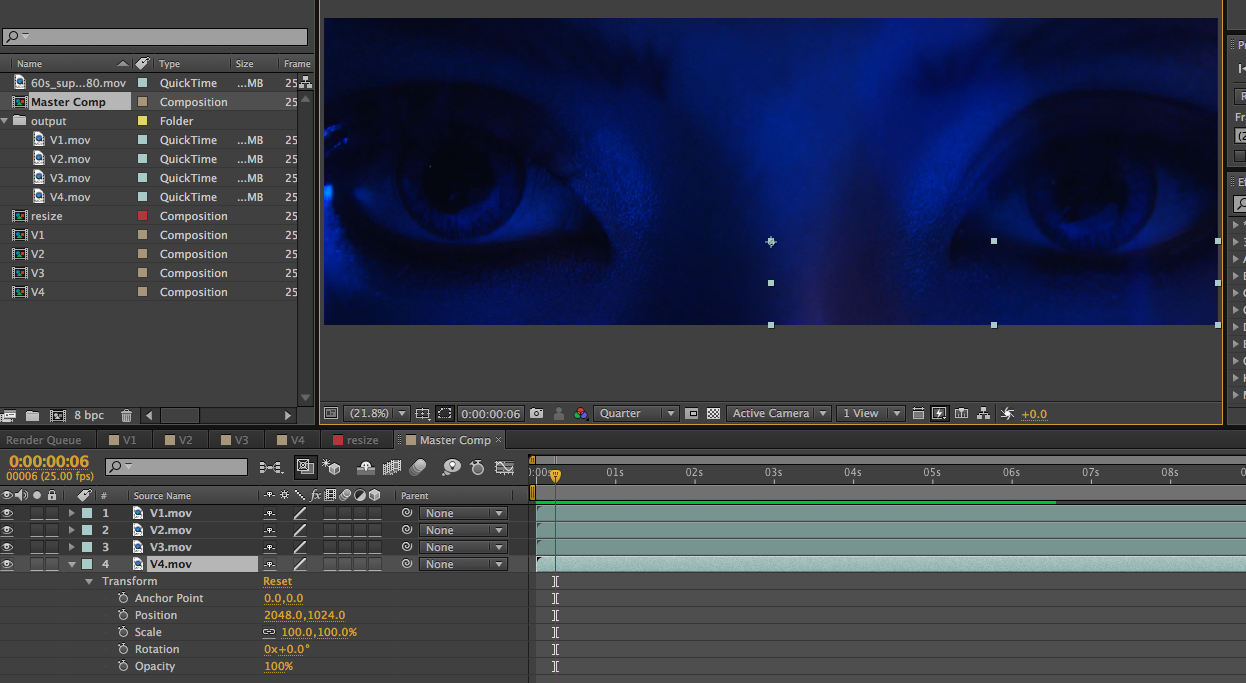 |
| Pic 8: Master comp
All the videos should align correctly to give a complete picture, even if one pixel is off you will see the dividing line between the 2 images, play the video to check if there are any problems. If there is a problem go back and check all the numbers for each and every export and see if there is a problem there.
Step 9: Convert the video format.Now you can convert the 4 cropped of videos into what ever format and compression you need, like most large screens require either wmv or mov as outputs. Don't forget audio file needs to be given separately. Step 10: Check on the giant screen.Finally if possible check the film on the giant screen to know that it all worked out fine.
For more interesting articles click on Auggielicious Index to see the list, and to be in touch hit Like / Follow on the blog button on the right hand side or hit Like on the Facebook page Auggielicious for information, latest news and events beyond the blog..
|